


Gnomes are really big this year, right? I see them everywhere!
And it makes me happy because I love Snow White, The Hobbit, and all things gnome.
Recently we had our nieces in town and thought it would be fun to make a craft together so we chose DIY gnomes!
They are actually super easy to make and fairly inexpensive too – especially if you choose to use the items we did. I’ll share the steps to make the gnomes and the materials we used below.
Note: The other tutorials we found online seem to be a little more expensive because they used wooden elements for the body of the gnomes. We actually went through our recycle and used a coffee cup and toilet paper rolls to make the gnome bodies! I still think they came out pretty good so don’t feel you have to go crazy buying gnome bodies.
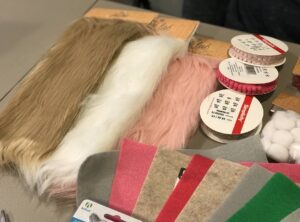
Materials for DIY Gnomes
Gnome noses. These are the exact wooden balls I used.
Faux fur. I recommend this craft fur. It’s not the brand I got at Joann’s but pretty much the same thing and they come in a bunch of colors. These squares are actually slightly bigger than the ones I got (mine were 9 inches by 12 inches and these are 20 by 20). You can probably make 3 gnomes out of each square. Don’t forget that if you want to make more gnomes to get more noses!
Gnome heads. We used a 6-pack of styrofoam balls.
Gnome hats. We used soft felt for the hats that I found at Joanns.
Gnome bodies. I saw other people using wood spools but that was too expensive for my taste. We used items from our recycle including a to-go coffee cup and toilet paper rolls!
Optional: You can use a pom pom for the gnome hat. I like these white ones.
Optional: You can put cute ribbons around the felt hat. I’m partial to a braided gold trim like this one.
Optional: Cut a pair of fuzzy socks for arms and legs. Personally, I didn’t love the gnome we made with the arms and legs. I liked the long floor-length beard look better but you can pick what you like!
Also make sure to have a glue gun, glue sticks, and scissors.
Do you need a gnome pattern?
I didn’t purchase a gnome pattern and don’t think it’s necessary. It’s not too hard to cut the felt hats to size in my experience. Plus, you may want to make different size gnomes like we did below.
How to Make DIY Gnomes Step by Step
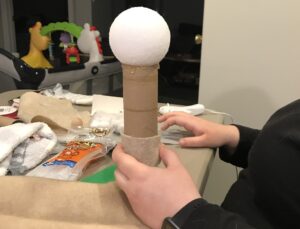
Step 1: Glue the styrofoam ball to the toilet paper roll or coffee cup.
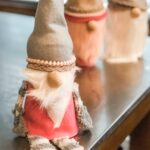
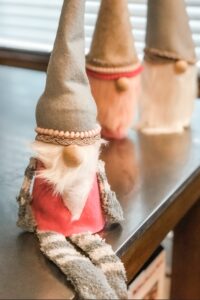
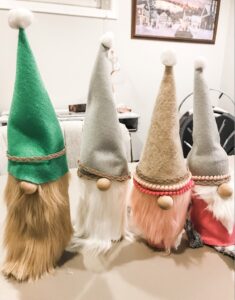
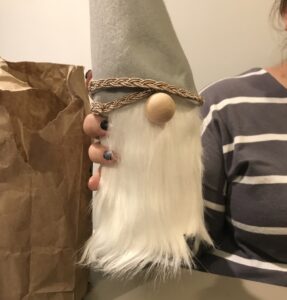
Step 2: Figure out what kind of beard you want. Here are the 4 gnomes we made all with different beard lengths. The floor length white-bearded gnome grew on me and I like that one the best probably.
You’ll want to cover the part of the toilet paper roll or coffee cup that will be sticking out (if it will stick out at all) with felt and how much you need depends on the length of beard.
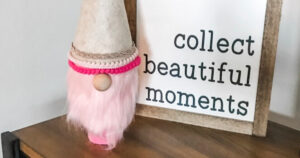
Floor length gnome beards like the white and green gnomes above will not show any of the body so you don’t have to worry about covering it in that case. The pink gnome has a toilet paper roll with about 3 inches of felt around the bottom. The gnome with the white short beard has an entire to-go coffee cup wrapped in pink felt as the body.
I also researched shorter gnomes without bodies like the ones on this other blogger’s tutorial. I ended up deciding that I wanted a taller gnome rather than a shorter gnome. The toilet paper roll and the coffee cup allowed me to have the height I wanted. It really depends on what look you want.
Step 3: Cut the fur to the size you want. With a 9 by 12 inch faux fur sheet, we were able to make at least 2 gnomes per fur. We were only limited by the number of noses we bought because I only bought a 4-pack.
Important! Make sure you cut the fur so that the direction of it makes sense and it hangs down. Also, don’t straight trim the fur in a straight line because it looks like a straight cut and looks weird. You want to cut the fur backing higher up and let the fur kind of hang off it at the bottom to look the best and most like a gnome.
Also be prepared to make kind of a mess. The fur goes everywhere unfortunately.
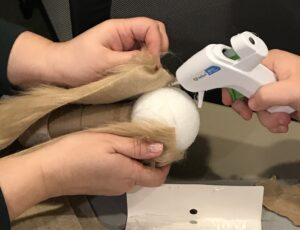
Step 4: Glue gun the fur to the styrofoam ball about 3/4 of the way up.
Step 5: Roll the felt around the styrofoam ball to understand how big the hat needs to be and then cut the fabric. Glue the the felt hat to itself and to the ball. This part took the longest so don’t get frustrated if it takes awhile. You’ll want to get the hat right.
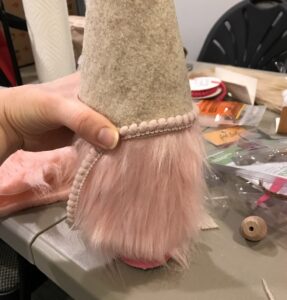
Step 6: Cut the trim to size and glue the trim on the hat.
Step 7: Glue on the nose! The nose positioning is super important so take your time here.
Step 8: Glue on the pom pom to the top of the hat if you choose to use one.
Then you’re done! This whole process could take 15 minutes or it could take 40 minutes if you’re a perfectionist like me and also not super familiar with the glue gun. I love our finished result and they’ll be so cute for Valentine’s Day!
Valentine’s Day Gnomes or St Patricks Day Gnomes
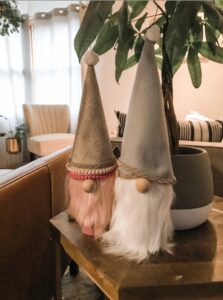
What makes these gnomes Valentine’s Day gnomes or St Patricks Day gnomes are the color schemes. Personally, I love the pastel, light-colored boho look to the gnomes and thus we didn’t choose really bright reds or pinks for the felt hats.
I recommend choosing a neutral color felt for the hat like gray or oatmeal and then going with a light pink or white beard. The understated look helps these gnomes look better and more natural on display in a living room. That’s just my opinion though!
For St. Patrick’s Day, we went with bright green though and loved the look!
- How to Make a Backyard Movie Theater with a projector screen - September 19, 2020
- HONEST Passive Income Planner Girl by Michelle Rohr course review - May 25, 2020
- 35 Pink Aesthetic Wallpapers with Quotes and Collages - May 20, 2020
Leave a Reply